- English
- Español
- Português
- русский
- Français
- 日本語
- Deutsch
- tiếng Việt
- Italiano
- Nederlands
- ภาษาไทย
- Polski
- 한국어
- Svenska
- magyar
- Malay
- বাংলা ভাষার
- Dansk
- Suomi
- हिन्दी
- Pilipino
- Türkçe
- Gaeilge
- العربية
- Indonesia
- Norsk
- تمل
- český
- ελληνικά
- український
- Javanese
- فارسی
- தமிழ்
- తెలుగు
- नेपाली
- Burmese
- български
- ລາວ
- Latine
- Қазақша
- Euskal
- Azərbaycan
- Slovenský jazyk
- Македонски
- Lietuvos
- Eesti Keel
- Română
- Slovenski
- मराठी
- Srpski језик
Prevention and control of cracking and hidden cracks in stamping parts of automobile bodies
2024-08-09
The size of the outer covering parts of automobile stamping is larger than that of the internal parts, and the shape is more complex. The parts are drawn deeper during the forming process, the forming surface is complex, and other factors affect the products. During the early debugging period, cracks or hidden cracks are prone to occur, which not only increases the manufacturing cost and causes material waste, but also the defective products are easy to flow into the subsequent production process and cause greater quality accidents. Therefore, the visible cracks and hidden cracks of automobile stamping parts must be controlled at the source to avoid the risk of poor quality in the manufacturing process.
Causes of cracking and dark cracks in parts
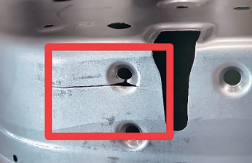
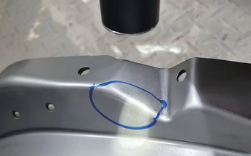
Cracking (Figure 1) is the appearance of cracks on the surface of the steel plate during the deep drawing process; dark cracks (Figure 2) are the appearance of orange peel-like stripes on the surface of the steel plate during the deep drawing process, which can be inspected by shining a white light flashlight parallel to the defective surface.

Figure 1 Cracking defect

Figure 2 Dark crack defect

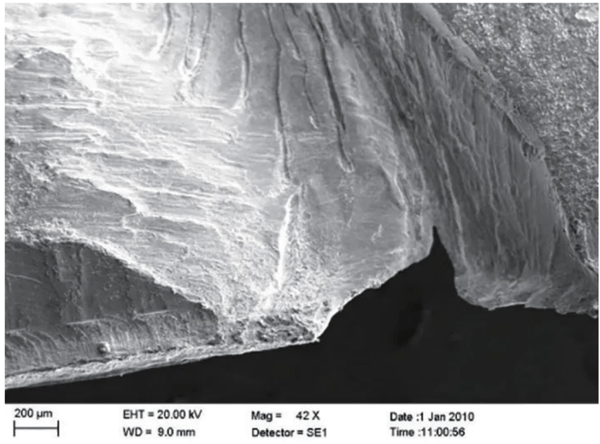
Figure 3 Microscopic analysis of inclusions

Figure 4 Composition analysis of inclusion sites
Method for checking dark cracks: Use a flashlight to point directly at the end of the R angle,about 10cm away from the plate. The end of the R angle is where dark cracks often occur.Note: You must use parallel light for inspection. There will be obvious shadows at the location of the dark cracks.
Problems with the material itself
⑴ Material appearance defects. If there are inclusions in the material itself, because the inclusions can withstand a small amount of deformation, cracks will appear at the inclusions when the material is stamped under external force. Inclusions are an occasional defect generated during the production process of strip steel. Microscopic analysis and composition analysis are performed by sampling, as shown in Figures 3 and 4.
⑵ Material performance defects. If one or more of the material mechanical performance indicators (Rm, Rp0.2, El, r, n, A, etc.) exceed the specified range or fluctuate greatly compared with the parameters of the parts inspected in the previous batch, it will lead to the risk of parts opening or cracking during the production process.
⑶ Material surface roughness. The surface roughness of the material will have a certain impact on the material flow of the part drawing process. The roughness meter can be used to measure whether the sheet material is within the process requirements.
⑷ The dimensional deviation, edge deformation and large burrs of the sheet material during the production process will also cause occasional poor opening and dark cracking. Severe strain during the forming process will also cause cracking.

Figure 5 Material properties table

Figure 6 Oil film measurement point location

Figure 7 Oil film measurement

Figure 8 Sampling plan
Opening and dark cracking caused by the mold
⑴ Drawing mold. The position of the stamping, the surface roughness of the mold, the mold grinding rate, and the stress of the draw rib groove will affect the forming of the part. Others include positioning, mold pressing surface, balance block, ejector coloring, part R angle state, etc. The mold will adjust the mold forming margin during the machine debugging process to meet the stability of the part forming within a certain pressure value range.
⑵ Shaping mold. Whether there is wrinkling in the shaping part, or the problem of shaping mold grinding will cause overlapping materials during mold shaping and cause cracking.
Opening and dark cracking caused by equipment
⑴ Cleaning the engine oil film The thickness and uniformity of the oil film on the surface of sheet metal parts will affect whether the parts will have cracks, dark cracks or wrinkles during the forming process. For example, the cleaning speed, squeeze roller pressure, cleaning machine speed, and oil injection volume are all important parameters that affect the oil film on the surface of parts. Figures 6 and 7 are the oil film measurement position and measurement photos, respectively.
⑵Pressure of the press. The verticality and parallelism of the press slide should be checked regularly, and the parameters of the hydraulic pad are also one of the important influencing indicators.
Preventive control measures for parts to crack and dark crack
Incoming material control
⑴Sampling of coils or sheets in advance before production (Figure 8), inspection of mechanical properties and composition analysis of materials, comparison with material standards, regular inspection, important data can be recorded after each batch for comparative analysis to confirm the stability of the process.
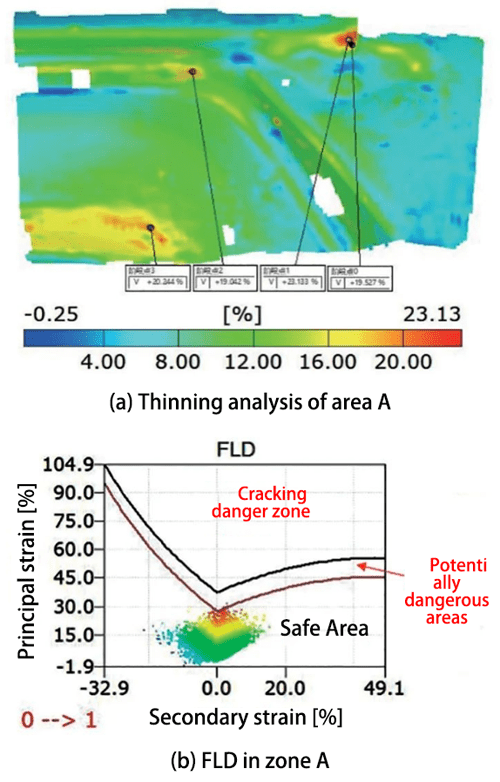
⑵Perform grid test on stamped parts, mark the parts prone to cracking on the sheet (Figure 9), perform data analysis after stamping (Figure 10), and determine the risky parts of the parts by analyzing the safety margin and thinning rate.

Figure 9 Parts marking

Figure 10 Data analysis

Figure 11 Inflow measurement position

Figure 12 Inflow measurement
Process control
⑴ Take out the parts after deep drawing and compare the inflow volume: Measure the inflow volume of the parts by adjusting the pressure or confirming the color of the mold balance block, the surface roughness of the mold blank holder and other parameters, and analyze the material flow in each area of the sheet metal after the parameter adjustment, as shown in Figures 11 and 12.
⑵ According to the CAE data analysis of the risk point map of the thinning measurement of parts, the thinning rate of parts is measured regularly, and the key positions of the risk of opening and dark cracking that may be caused are confirmed.
⑶ According to the CAE data analysis of the risk point map of the thinning measurement of parts, it is edited into the operating standard requirements, and the inspectors draw lines to check and confirm the risk positions of opening and dark cracking.


